-
Table of Contents
“Craft Your Style: Create Stunning DIY Resin Earrings with Our Step-by-Step Guide!”
DIY resin earrings are a fun and creative way to express your personal style while crafting unique accessories. This step-by-step tutorial will guide you through the process of making your own stunning resin earrings, from selecting materials to the final finishing touches. With just a few supplies and some basic techniques, you can create beautiful, one-of-a-kind pieces that showcase your creativity and make perfect gifts or additions to your jewelry collection. Whether you’re a beginner or an experienced crafter, this project is sure to inspire your artistic side.
Essential Tools and Materials for DIY Resin Earrings
Creating your own resin earrings can be a rewarding and enjoyable craft project, allowing for personal expression and creativity. To embark on this artistic journey, it is essential to gather the right tools and materials, as they will significantly influence the quality and outcome of your creations. First and foremost, the primary component of your earrings will be the resin itself. Epoxy resin is the most commonly used type for jewelry making due to its clarity, durability, and ability to capture colors and inclusions beautifully. When selecting resin, it is advisable to choose a high-quality product that is specifically designed for jewelry, as this will ensure optimal results.
In addition to resin, you will need a hardener, which is typically sold as part of a resin kit. The hardener is crucial, as it initiates the curing process, transforming the liquid resin into a solid, sturdy form. It is important to follow the manufacturer’s instructions regarding the mixing ratio of resin to hardener, as improper proportions can lead to incomplete curing and a compromised final product. Once you have your resin and hardener, you will also require mixing cups and stirring sticks. Disposable plastic cups work well for this purpose, allowing for easy cleanup after your project is complete. Stirring sticks, which can be wooden or plastic, are essential for thoroughly mixing the resin and hardener to achieve a uniform consistency.
To enhance your resin earrings, you may want to incorporate various additives such as pigments, glitters, or dried flowers. Pigments come in a variety of colors and can be used to create vibrant, eye-catching designs. When selecting pigments, it is advisable to choose those that are specifically formulated for use in resin, as they will not affect the curing process. Glitter can add a touch of sparkle and dimension to your earrings, while dried flowers or other inclusions can create a unique, organic look. It is important to ensure that any additives you choose are compatible with resin to avoid any adverse reactions.
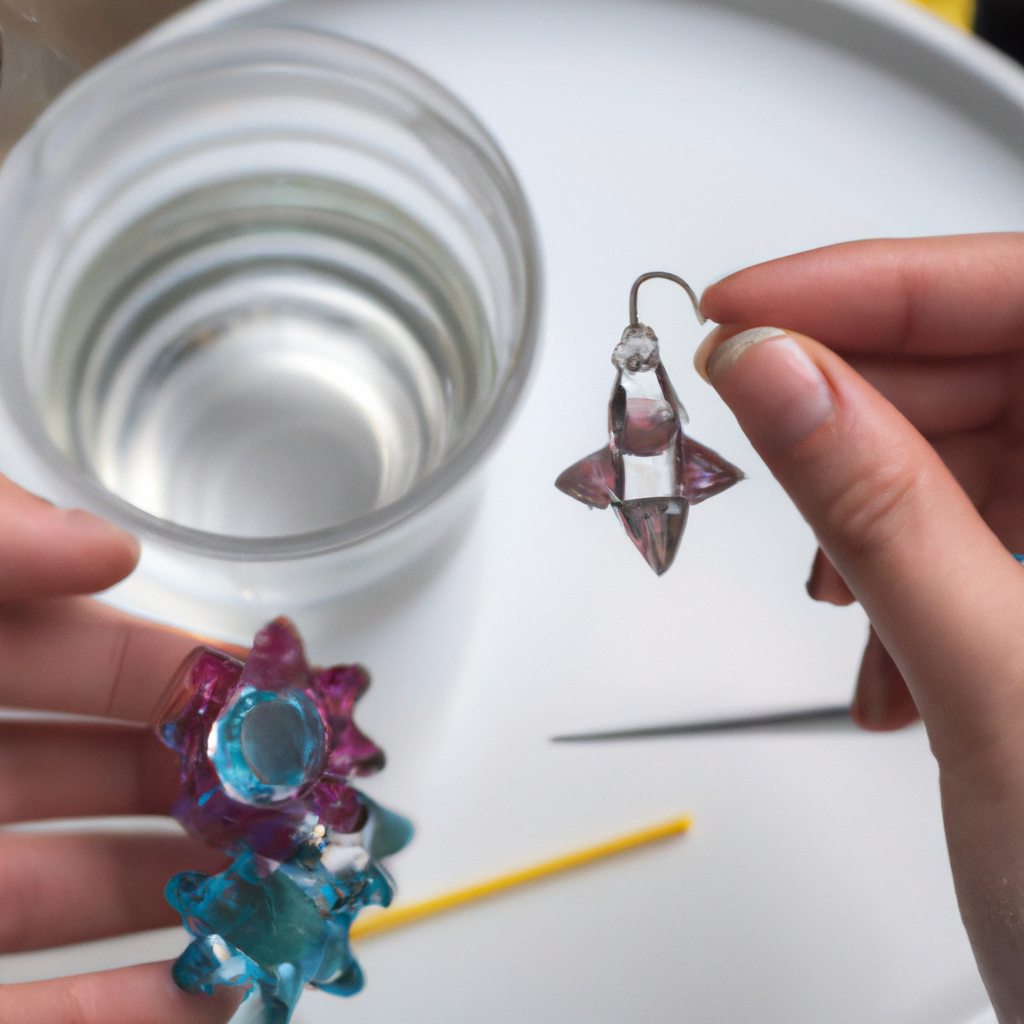
Furthermore, you will need earring findings, which are the components that will allow you to wear your creations. Common findings include earring hooks, studs, and hoops, all of which can be found in various materials such as stainless steel, gold, or silver. The choice of findings will depend on your personal style and any potential allergies to certain metals. Additionally, you will require pliers to attach the findings securely to your resin pieces. Round-nose pliers and flat-nose pliers are particularly useful for manipulating wire and making precise connections.
Safety should also be a priority when working with resin. Therefore, it is advisable to have gloves and a mask on hand to protect your skin and respiratory system from fumes. Working in a well-ventilated area is essential, as it minimizes exposure to any potentially harmful vapors released during the curing process. Lastly, a silicone mold is necessary for shaping your resin into earring forms. Silicone molds are preferred because they allow for easy removal of the cured resin without damaging the finished product.
In conclusion, embarking on the journey of creating DIY resin earrings requires careful preparation and the right tools and materials. By gathering high-quality resin, hardener, mixing supplies, additives, earring findings, safety equipment, and molds, you will be well-equipped to produce beautiful, personalized jewelry that reflects your unique style. With these essentials in hand, you can confidently move forward into the exciting world of resin crafting.
Step-by-Step Guide to Creating Your First Pair of Resin Earrings
Creating your first pair of resin earrings can be an exciting and rewarding endeavor, allowing you to express your creativity while crafting a unique accessory. To begin this process, it is essential to gather all necessary materials, which typically include epoxy resin, a hardener, silicone molds, mixing cups, stirring sticks, gloves, and any decorative elements you wish to incorporate, such as dried flowers, glitter, or pigments. Once you have assembled your supplies, you can proceed with the preparation phase, which is crucial for achieving the best results.
First, ensure that your workspace is clean and well-ventilated, as working with resin can produce fumes that may be harmful if inhaled in large quantities. It is advisable to cover your work surface with a protective layer, such as plastic sheeting or newspaper, to prevent any accidental spills from damaging your furniture. After setting up your workspace, put on gloves to protect your skin from the resin and hardener, as they can be irritating.
Next, you will need to measure the resin and hardener according to the manufacturer’s instructions. Typically, the ratio is 1:1, but it is vital to check the specific guidelines for the product you are using. Using separate mixing cups, pour equal parts of resin and hardener, ensuring that you do not exceed the recommended amounts. Once you have measured the components, use a stirring stick to mix them thoroughly. It is important to stir slowly and carefully to minimize the introduction of air bubbles, which can mar the final appearance of your earrings.
After achieving a uniform mixture, you can begin adding any decorative elements you desire. This is where your creativity can truly shine. For instance, if you wish to incorporate dried flowers, ensure they are completely dry to prevent any moisture from affecting the curing process. Gently fold the flowers into the resin mixture, taking care not to create too many bubbles. Alternatively, if you prefer a more colorful design, you may add pigments or glitter at this stage, stirring them in until evenly distributed.
Once your mixture is ready, carefully pour it into the silicone molds. It is advisable to pour slowly and from a height to help reduce the formation of bubbles. Fill the molds to the desired level, but be cautious not to overfill, as the resin may expand slightly during the curing process. After pouring, you may notice some bubbles rising to the surface. To eliminate these, you can gently blow on the surface or use a heat gun or torch to pop them. However, be cautious with heat sources, as excessive heat can cause the resin to cure improperly.
After ensuring that the molds are free of bubbles, allow the resin to cure according to the manufacturer’s instructions, which typically ranges from 24 to 48 hours. During this time, it is crucial to keep the molds in a dust-free environment to prevent any particles from settling on the surface of the resin. Once the curing period is complete, carefully remove the earrings from the molds. If any rough edges remain, you can gently sand them down using fine-grit sandpaper.
Finally, attach earring hooks or studs to your resin pieces using a strong adhesive, ensuring they are securely fastened. With this final step, your DIY resin earrings are complete, ready to be worn or gifted. This process not only allows for personal expression but also provides a sense of accomplishment, as you have transformed simple materials into a beautiful piece of jewelry.
Tips for Adding Color and Texture to Your Resin Earrings
When embarking on the journey of creating DIY resin earrings, one of the most exciting aspects is the opportunity to infuse color and texture into your designs. The versatility of resin allows for a myriad of creative possibilities, enabling artisans to craft unique pieces that reflect their personal style. To achieve stunning results, it is essential to understand the various methods and materials available for adding color and texture to your resin earrings.
To begin with, selecting the right colorants is crucial. There are several options available, including liquid dyes, pigments, and mica powders. Liquid dyes are particularly effective for achieving vibrant, translucent colors, while pigments offer a more opaque finish. Mica powders, on the other hand, can add a shimmering effect that enhances the overall aesthetic of the earrings. When choosing colorants, it is advisable to experiment with small batches of resin to determine the desired shade and opacity before committing to a larger project. This trial-and-error approach not only helps in perfecting the color but also allows for the exploration of different combinations.
In addition to colorants, incorporating textures can elevate the visual appeal of your resin earrings. One popular method is to use natural materials such as dried flowers, leaves, or even glitter. These elements can be suspended within the resin, creating a captivating three-dimensional effect. When using organic materials, it is important to ensure they are completely dry to prevent any unwanted reactions with the resin. Additionally, layering different materials can create depth and intrigue; for instance, placing a layer of glitter at the bottom and embedding flowers on top can yield a stunning contrast.
Another effective technique for adding texture is to manipulate the surface of the resin itself. After pouring the resin into the earring molds, you can use tools such as a toothpick or a heat gun to create swirls or patterns. This method not only adds visual interest but also allows for a more organic feel to the finished product. Furthermore, experimenting with different pouring techniques, such as the “dirty pour” method, can yield unique marbled effects that are both eye-catching and sophisticated.
Moreover, it is essential to consider the curing process when working with colored and textured resin. The curing time can vary depending on the type of resin used, and it is crucial to follow the manufacturer’s instructions for optimal results. During this time, avoid moving or disturbing the pieces to ensure that the colors and textures settle as intended. Patience is key, as rushing this process can lead to imperfections that detract from the overall quality of the earrings.
Finally, once the resin has fully cured, the finishing touches can make a significant difference in the final appearance of your earrings. Sanding the edges can create a smooth finish, while polishing can enhance the shine of the resin. Additionally, applying a top coat of resin can provide an extra layer of protection and brilliance, ensuring that your creations remain vibrant and beautiful over time.
In conclusion, adding color and texture to DIY resin earrings is a rewarding endeavor that allows for endless creativity. By carefully selecting colorants, incorporating natural materials, manipulating the resin’s surface, and paying attention to the curing process, artisans can create stunning pieces that are not only visually appealing but also uniquely personal. With practice and experimentation, anyone can master the art of resin earring design, resulting in beautiful accessories that showcase individual style and craftsmanship.
Q&A
1. **What materials do I need to make DIY resin earrings?**
You will need epoxy resin, hardener, silicone molds, mixing cups, stirring sticks, gloves, and any decorative elements like glitter, dried flowers, or pigments.
2. **How do I prepare the resin mixture for the earrings?**
Follow the manufacturer’s instructions to mix the resin and hardener in the correct ratio, typically 1:1. Stir thoroughly for several minutes until fully combined and clear.
3. **What is the curing time for resin earrings?**
The curing time can vary, but generally, it takes about 24 hours for the resin to fully harden. Ensure they are left undisturbed in a dust-free environment during this time.DIY resin earrings are a creative and rewarding project that allows for personal expression and customization. By following a step-by-step tutorial, you can successfully create unique pieces that reflect your style. The process involves selecting materials, mixing resin, adding colors or inclusions, and carefully pouring the mixture into molds. After curing, the earrings can be finished with hardware for wearing. This hands-on activity not only results in beautiful accessories but also provides a satisfying crafting experience. Overall, making resin earrings is an enjoyable way to explore your artistic side while producing one-of-a-kind jewelry.